What Can a Teapot Teach You About Rendering?
Learn how to use VRay Proxy to import geometry from an external mesh through this teapot example in Vray 3.2 for 3ds Max in this free tutorial.
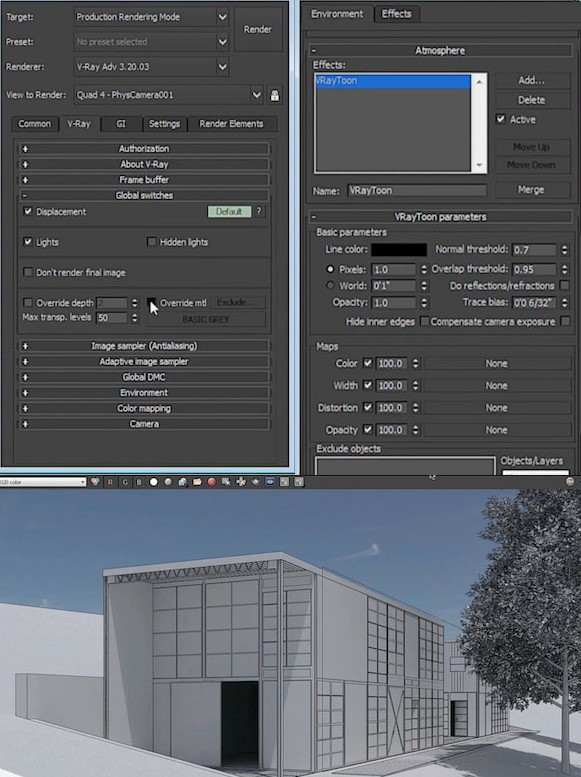
Learn about applying the Vray Toon Effect in Vray 3.2 for 3ds Max in this free Black Spectacles tutorial.

In this Black Spectacles free tutorial, you will learn how to have some fun with your rendering by applying the V-Ray Toon Effect. This tutorial is part of the Black Spectacles course on 3D Rendering with V-Ray 3.2 for 3ds Max in which you will learn how to bring a 3d model into V-Ray, render it out, and touch it up in Photoshop to give your final image a professional finesse. On to the free tutorial:
Now that you have your rendering, there’s another trick in Max which is a pretty fun style and more of an artistic take on the rendering. And it’s simple to do.
Go to the “Render Setup” window, and click on the “V-Ray” tab. Within that tab, open up the “Global Switches” section, and check the box for “Override mtl.” Using the override material will get everything white.
Next, go to the “Rendering” menu at the top of your screen, and go down to “Environment.” Scroll down to the “Atmosphere” section. Within the Atmosphere, click “Add” to add a new effect. And one of the rendering effects is called “VRayToon.” Click on that, and hit “OK.” The VRayToon effect is a global effect. You can exclude objects from it. You can pick the line color. You can pick the pixel width for the line color. For this example, keep the line color black, and set the pixel width for the line color to 1. Then you can close out the window.
Now that you’ve applied the materials override and the VRayToon effect, go ahead and render the image. You’ll notice, everything is the same gray color. This is because of render material override. What the rendering Toon effect does, is it basically renders all the geometry with line work outline over it. The line-work can be any color and any thickness. So you can see it creates some cool effects in the renderings.
Learn how to use VRay Proxy to import geometry from an external mesh through this teapot example in Vray 3.2 for 3ds Max in this free tutorial.
Master Vray and SketchUp with our free 3D rendering with Vray for SketchUp and Rhino 5 tutorial.
Learn about creating a daylight system in Vray 3.2 for 3ds Max in this free tutorial.