A free tutorial from the Black Spectacles course The Basics of Computational Design in Dynamo.
In this Black Spectacles FREE tutorial, you will learn how to use Number and Integer Sliders as an alternate way of translating geometry. This tutorial is part of the Black Spectacles course on computational design in Dynamo in which you will learn the basics of how to navigate Dynamo and harness the power of computational design to create complex forms quickly and precisely. View the entire course here.
Number and Integer Sliders Tutorial
Step 1: Start a new branch with a Number Slider
With this second branch, you want this one to be more dynamic. To change the original definition, you actually have to manually click inside the number box and type a new number. However, there’s a more dynamic way of being able to change things within Dynamo and that is by using something called a “Slider.”
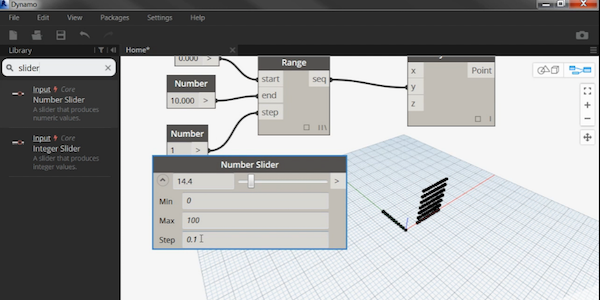
Type “slider” into the search bar, and you’ll see there are two different types of sliders in Dynamo. There’s a “Number slider” and an “Integer slider.” Number has fractions, Integer is complete, whole numbers. So the rule of thumb here is that if you’re dealing with objects that can’t be divided, use an Integer Slider. If you’re dealing with distances, use a Number Slider. In this case, you are dealing with a distance, so select the Number Slider.
It’s important to change the slider to a number to start, as opposed to leaving it at zero. For this example, change it to 14.4. Within the slider, you can also set a minimum, maximum, and step. For this example, leave it at a minimum of 0, maximum of 100, and step of 0.1.
Step 2: Create one single point
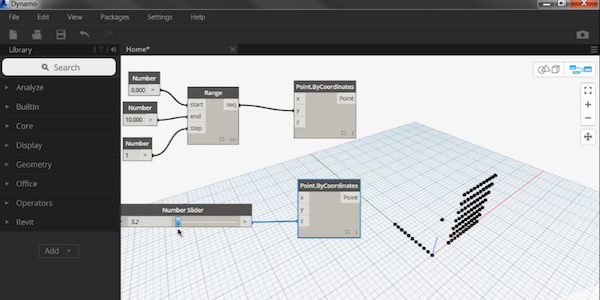
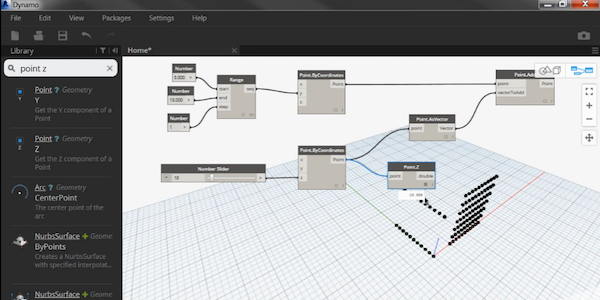
Next you are going to create one single point with this slider. Type “point” in the search bar and select “Point by Coordinate.” Then plug your slider into the “Z” on your point. Once you do that, you can see your original row of points, and if you move the slider back and forth, you can see that point Z moving up and down dynamically.
Step 3: Use a point as a vector
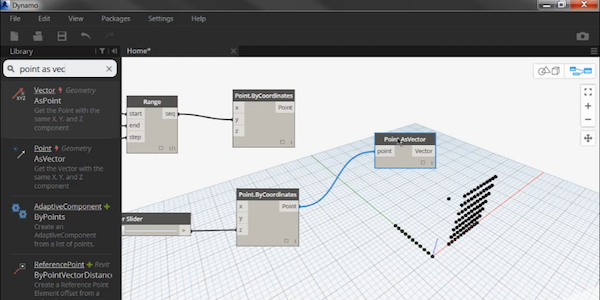
Next, using that point, you want to have the whole row of points follow that movement. So essentially you are going to create another row of points that has the ability to move up and down. To do that, you need a vector. But in this case, you are actually going to use a point as a vector. So type in “Point as vector” into the search bar and select “Point.AsVector.” Once you have that on your canvas, as an input it’s looking for a point, so plug your “Point.AsCoordinates” into the “point” on your “Point.AsVector.”
Step 4: Convert the point to a vector
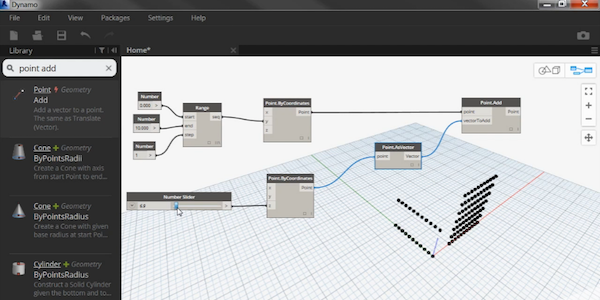
To use this as a vector, there’s another node you need called “Point Add.” Select that and you can see the input for it is a “point” and then a “vectorToAdd.”
So the output for this one (“Point.AsVector”), converts the point to a vector, and it’s using the trajectory from your slider as the Z direction. So basically, it takes that point, takes the Z direction, converts it to a vector, and then you plug that vector into the vector input for your “Point.Add” node. Finally, take your original points, and plug that into the point input of the “Point.Add” node.
As soon as you can do that, you can see it translates those points up to the second point that you created. Now, if you move that slider, not only does that one point move, but the whole row moves up and down. It’s another alternate way of translating geometry.
Step 5: Query Nodes vs. Create Nodes vs. Action Nodes
Another thing to point out is that all of these nodes are generating data all the time. So if you want to pull out a particular piece of data, there are nodes to do that as well.
So for example, if you want to know what the Z coordinate is of this point, you could obviously look over at the slider and see that it is 10, but on a larger, more complicated definition, you may want to pull data out at certain points just to see what Dynamo is doing. So in this case you can just add a node called “Point Z.” This is what’s called a query node. The little question mark you see is what designates it was a query node, which means you are pulling data out of the definition.
So plug your point into the “Point.Z” node, and then if you click on the little square within that node, this is a little preview that will tell you exactly what is inside that node. So click on that and you can see that it is 10. And if you were to move the slider back and forth, that number within the Point.Z node changes with it. So that is a query node.
The Point.ByCoordinates node is a Create Node, and there are also Action Nodes which are something like the Point.AsVector node. Those are the three major distinctions between the nodes in Dynamo.
Learn more about our Software Learning here.